Now that I have finished all of my work and have received all of the feedback from my crit I am satisfied with the overall project. Although not everyone agreed with my choices of location, some did understand why I picked the placed that I did. Almost everyone had good things to say about my stitching and also about my theme. If I were to do this project again I would maybe take into consideration what was said about location and maybe look for somewhere else that does a similar thing to what I was after.
There is little else that I would change about this project as I feel it has all worked out well and I am pleased with that I have learnt. Although I knew how to edit the images I did not know the difference between destructive and non-destructive editing, such as using layer masks to edit the levels and to remove parts of the image so that the data is not lost and can be easily put back to the original state. This is something that I will take with me through future projects and also in the future away from University as I will conciser this every time I use Photoshop or similar editing software.
I have enjoyed this project thoroughly and look forward to seeing what the next brief will bring.
Tuesday, 18 October 2011
Crit
After finishing my panoramas and adding them into the code, I showed the finished work to my class and teachers for feedback.The main things that were fed back to me were about the theme, stitching and locations.
It seemed that the main reaction to my theme was that it was a strong and clever idea, however there was a mixed reaction to my locations. Some of my peers could see how the locations worked with my theme and with eachother, while the others disagreed and said that they were boring to look at. A very good comment that was made by one of my peers to the others was "the images on their own aren't hugely effective, however with a theme like this they are made to go together, not separately". I am glad that this was said as it is completely true. My images have been created to fit in a a theme together. Alone my images look like just a wood and just a attic but together they show meaning and pattern.
The other comments I received were about my stitching, as far as criticism goes I got little to none, this is fantastic as before doing this project I have never before created a panorama and have had to do stitching to this extent.
I can understand and appreciate all of the comments made about my work. Although there were a few negatives they seemed to be balanced well with positive, so overall I am pleased.
Coding
When it came to coding my work I was a little worried as I wasn't quite sure how to do it, however when I got the files given to me I realised how simple it was to add the images to the code.
The first thing you do is to save a copy of your image into the images part of the code files. After this you open the "pan1" file in TextWrangler, the code opens up and looks like this.

As you can see there is a line of code saying where the image is coming from (highlighted above) to swap this example image for your own you simply delete the text and write in the file name of your image.
After saving that its all ready to be shown. However the code is linked to some Jquery which has a speed set in it. If you decide that you want this to be faster or slower then you can change that easily. To do this you need to open the Jquery in TextWrangler, this is what it will look like.

One you have this you can simply change the speed by changing the number (highlighted above) to get a higher speed you will need to increase the number and to slow it down select a smaller number.
Another thing you can do with the code is to make separate speeds for each of the panoramas. To do this you simply duplicate the Jquery file and rename it something different in this case "two"
When you the open that code up you can change the speed as before and to link it to your second panorama you will need to open up "pan2" as you did in the first step for "pan1" and change the part (highlighted below) from "jquery.panorama.js" to "jquery.panorama.two.js". Saving this out will change the speed for only that panorama. You can do this over and over again for each panorama, making sure that each is linked and has a different file name.

Resolution Issues
I took all of my individual images using my DSLR, because of this each of my images were very large and had a very high resolution. This didn't seem like an issue until I tried to add around 30 of these images into one document. The mac I was using for the most of the project had just 1GB of RAM resulting in everything taking ages to do. Even just cropping my image took somewhere around 5 minutes. The other computer I was working on was my PC at home, I find this struggles at the best of times to do anything so asking it to open just two of my images into the same file made my life difficult, for this reason when working on my PC, I had to drastically reduce my file sizes before adding them into one document. To do this I simply opened the individual images into Photoshop and using the "image""image size" drop downs I could then resize my images to just 400pixels high to make it easier for my computer to cope. Although the need for this on the mac was less drastic I did find that reducing the size, even to 1000 pixels high, sped up the process.
When I was making my first panorama, I made the mistake of leaving the images at full size while editing them together. Although the cropping was slow, it looked incredibly fast compared to how long it took to save. Having the images at full resolution slowed everything down, gave me huge image files and was completely unnecessary seeing as the images we needed at the end only had to be 400 pixels high. I am glad that I quickly learnt that shrinking the images make the process quicker, otherwise this project would have been a lot more stressful and a lot longer!
When I was making my first panorama, I made the mistake of leaving the images at full size while editing them together. Although the cropping was slow, it looked incredibly fast compared to how long it took to save. Having the images at full resolution slowed everything down, gave me huge image files and was completely unnecessary seeing as the images we needed at the end only had to be 400 pixels high. I am glad that I quickly learnt that shrinking the images make the process quicker, otherwise this project would have been a lot more stressful and a lot longer!
55Laney69
After having seen the work of a photographer who goes by the name of "55Laney69" I was hugely inspired to take my second two panoramas and conbine them like he did in this image below.

I knew that it would be harder to get the same effect as he has given in his flat panorama in my cylindrical one as I would have to blend my lit scene into my dark scene and then blend it back out again before the end of my panorama so that I dont get a large line between the two times when I play it in the cylindrical code.
The first thing I did with both of my images was to open them both in Photohop. I then cut out a section using the marquee tool out of my night time scene photo. I then dropped this into a new layer over the top of my day time scene image. All I did after this was to use a layer mask and using the blending techniques as before when making the actual panoramas, I merged and blended the two layers to give the same effect as 55Laney69 gave in his panoramas. Here you can see what my image came out like
I have decided to discard this idea now that I have tried it as it does not look particularly good with my images. The idea was to make it blend from light to dark and then back out again, but this panorama looks more like I have had a problem with my colours and have not been bothered to fix it. Over all this was a nice idea which worked for 55laney69, but for me it was not as successful. I am glad I tried the idea but this time it will just stay on my desktop as an experiment that didn't quite work.
Second set
I have now completed my second set of panoramas which were both set in my attic.
The first was taken in full light to show the interesting shapes of the attic and to make it feel as welcoming and warm as an attic can feel, while the other was taken in the dark with a single torch lighting up certain parts of the attic like a suitcase and the pipe work, this was to give the image a completely different look and feel to the first panorama. I chose my attic as after I had done the woodland scene I wanted to do an inside scene but wanted to keep some similarities such as the wooden beams that are similar to the trees and the idea of woods being a scary place at night and attics also being seen as a scary place to be. I like both of these panoramas, however I don't feel my dark scene is quite as effective as my woodland night scene as the colours don't look as cold and dark, although I do like how the light indoors has created shadows and odd shapes making the scene look scary. I feel that the lit scene in the attic shows that I understand how to stitch my images well as it was a challenge with all of the wooden beams.
Here you can see both of my attic panoramas.
The next thing I will be doing is adding my images into the code we have been given.
Second set of panoramas
Now that I have all of my images for my third and fourth panoramas I can put them together in the same way as my first set, using layer masks, colour match and varies types of the transform tool, such as warp, skew and distort.
I mainly needed the transform tools to realign the beams in my attic, as when I was taking photos the perspective in each image is different.
Here you can see how using the transform tool can fix a problem like this.


I mainly needed the transform tools to realign the beams in my attic, as when I was taking photos the perspective in each image is different.
Here you can see how using the transform tool can fix a problem like this.


I will continue to use this and the other techniques to build my third and fourth panoramas. After this I will then look at putting them into the code.
Attic
After looking at the idea of doing an indoor shoot and linking it to a fearful place I thought there would be no place better than my attic. This is the sort of place that no one would want to be in the dark especially when there are objects lit from underneath as this causes odd shadows and a very scary atmosphere.
I also like that fact that my attic has a lot of wooden beams around the edges which not only make it look visually interesting but also link it back to my first panorama as that was all wood based.
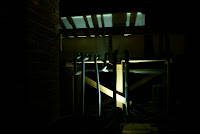
So I took my tripod and my camera up to the attic along with a single torch (the same one used in my previous scene). I first took photographs in full light to show the room at its full and make it look semi inviting and not one bit scary. I then left my tripod and camera in exactly the same place and took the images again but this time with the lights off. I used the torch to light certain parts of the room creating odd shapes and scary shadows making the images look spooky and dark as I did with my woodland scene.
Here you can see how much the same photo changes when the lighting is different.

I also like that fact that my attic has a lot of wooden beams around the edges which not only make it look visually interesting but also link it back to my first panorama as that was all wood based.
So I took my tripod and my camera up to the attic along with a single torch (the same one used in my previous scene). I first took photographs in full light to show the room at its full and make it look semi inviting and not one bit scary. I then left my tripod and camera in exactly the same place and took the images again but this time with the lights off. I used the torch to light certain parts of the room creating odd shapes and scary shadows making the images look spooky and dark as I did with my woodland scene.
Here you can see how much the same photo changes when the lighting is different.


Preparing for next shoot
After having completed my first two panoramas successfully, I now need to go out and shoot my next two. Like before I would like to do both of these panoramas at the same time so that they are in exactly the same place making my theme a lot stronger.
I have been thinking hard about where I would like to shoot my next set of panoramas. My first thought was to do the opposite of my original so that there was contrast however I have realised that there are more than one thing I could do within this idea. First the idea of having natural and urban, so in this case a wood and a street or town centre, although this would not quite give the same effect as before with lighting from underneath making the scene look spooky as the street would be pre-lit and I would have no control over how it looks. My other thought was to do an outdoors and indoors shoot, so a wooded area and a room of some sort.
I like the idea of inside and outside, still using this idea of how lighting can change the feel of the photo instantly. I now just need to pick a room that will be effective. I would like to pick somewhere that can also link back to fears as a child as my night time woodland scene reminds me of a spooky forest out of a fairytale, this idea of a fearful place becoming inviting would also work very well with my theme.
Importance of a tripod
It seems that I was very lucky with my first shoot for my panoramas as my tipod had a spirit level and without thinking about it, I used it and ended up with straight images. Looking at some of the other work in the group, I can see that people have struggled with having a wonkey tripod. This is a huge issue as it creates photos that are not level.
If your tripod goes up and then back down around your panorama, it becomes a nightmare to stitch together and normally results in a large amount of the photo having to be cut off. Here is a diagram I have drawn to show how uneven photos causes you to have to cut and crop large parts off of your panorama.The black lines are to represent where you would need to crop this panorama.


If your tripod goes up and then back down around your panorama, it becomes a nightmare to stitch together and normally results in a large amount of the photo having to be cut off. Here is a diagram I have drawn to show how uneven photos causes you to have to cut and crop large parts off of your panorama.The black lines are to represent where you would need to crop this panorama.

And here is a diagram I have drawn to show how much more of the image you can keep when your tripod is flat.

Because of how much data you could lose by having a slightly uneven tripod, I have realised that I will need to continue using the spirit level on my tripod to insure that the images will be as flat and inline as possible.
Tuesday, 11 October 2011
Ideas
After seeing how my night scene came out I was worried that my day time scene would not be as good, and because of this I was planning on changing my initial idea and sticking to just night time scenes instead of having the contrast between day and night.
However now I have seen how my day time scene has come out I can see how well the time difference effects your view on the area and this has made me want to stick with my initial idea and create another two panoramas which also show day and night of the same location. All I need to do is decide where I want my next location to be.
While I was searching for some inspiration for locations and possible themes for the next two panoramas, I came across this panorama.


When I was looking at this panorama I realised how powerful light and time is when taking photos. It also gave me faith in my chosen theme as the panoramas I have created so far, much like these above, work well on their own but could also work well in one single panorama.
This is an idea that I would like to try with my own work as it really works with my theme of comparing the same scene at different points in time.
However now I have seen how my day time scene has come out I can see how well the time difference effects your view on the area and this has made me want to stick with my initial idea and create another two panoramas which also show day and night of the same location. All I need to do is decide where I want my next location to be.
While I was searching for some inspiration for locations and possible themes for the next two panoramas, I came across this panorama.

When I saw this it shocked me how well the photographer had blended the two times so well. Although this is a one off piece by the photographer who goes by the name of "55Laney69" I loved the idea of this and wanted to know how it had been done.
The more I looked up the picture the clearer it became to how he had blended the photographs so well. I found the two original panoramas, which looked beautiful on their own. One was of this view in the bright day light while the other one showed the same scene in the night with a burnt orange sky and lights illuminating the paths and sides of buildings. The two images have such different looks and feels, one looking light and scenic while the other looks harsh and urban.
The more I looked up the picture the clearer it became to how he had blended the photographs so well. I found the two original panoramas, which looked beautiful on their own. One was of this view in the bright day light while the other one showed the same scene in the night with a burnt orange sky and lights illuminating the paths and sides of buildings. The two images have such different looks and feels, one looking light and scenic while the other looks harsh and urban.
Here are the two original images before they were blended together


When I was looking at this panorama I realised how powerful light and time is when taking photos. It also gave me faith in my chosen theme as the panoramas I have created so far, much like these above, work well on their own but could also work well in one single panorama.
This is an idea that I would like to try with my own work as it really works with my theme of comparing the same scene at different points in time.
Making it 360
I spent the rest of last night putting together my second panorama using mainly the techniques I blogged about yesterday, although there were a few layers that needed extra adjustments using the levels and hue and saturation panels.
After I was happy with the look of my flat panorama, I needed to make it join up seamlessly at either end so that it would work as a 360 panorama when played in the code. This is the part that I struggled with when making my first panorama, as I was trying to take parts of the first layer and merge them with the last layer. This technique seemed to be working well but when changing the colours and levels I then found that I was then back to square one with ends that didn't match up.
It took me a while but I finally realised that if you save the image as a JPEG so that you have just one layer, you can then duplicate this (just incase something goes wrong!) and select half of the image up to a point of no interest, however if you do not have a reasonably blank section, it is best to pick a very busy point in your photograph where people will not notice if there is a slight change. Here is a screen shot showing the point I used when doing my second panorama.
After selecting the point I wanted to use, I removed it by using "cut". Before pasting it back into a different layer I first moved the other part of the image that I had left behind to the far left of the canvas. Then using paste I bought back the other section and moved that to the right hand side of the canvas so the two sides were touching again.
Once I had my image like this it was a case of just editing it like before so that the ends blended together. After I had used a layer mask my image looked like a whole. This means that all of the image will flow properly when I put it in the code later on.
Here is my finished panorama.
Monday, 10 October 2011
More Stitching
After sorting out the position and angles the images needed to be at I then started looking at blending in the lines so they were harder to see. To do this I first added a layer mask, after adding this I then used the black and white paint to add and remove parts of the overlapping layer, by doing this I could integrate the two layers without a harsh change, below I have added screenshots of me working with this technique.


After changing the colour so that there is a lot less of a jump, I then used the same technique as before with the layer mask to blend the final line, giving me this result


After having done this to most of the joins I found that some were in desperate need of a colour blend. I have been taught a quick and easy way of doing a colour change between two layers using the "colour match" tool on the adjustments drop down list. It works well, however it is a destructive way of working so you must always duplicate the layer before hand so that you can go back to its original form if you need to.
So after having duplicated my layer, I went to "image","adjustments","colour match" and from there I filled in this box
So after having duplicated my layer, I went to "image","adjustments","colour match" and from there I filled in this box

In this box you can choose the layer you want your currently selected layer to be similar to. In this example I have asked for the layer to match the colours in layer 13. Once you have done this the layer will change behind the pannel making it easy to cancel and go back to the original colour.
Here I have some more screen shots to show how well this technique works.


This is how I aim to continue editing my images so they they are all seamless and look like they flow properly. I will continue this tonight and aim to finish in time to then start my research tomorrow morning to get inspiration for my second set of panoramas.
Stitching
I am currently editing my second panorama in Photoshop, I am taking points of interest, such as a tree trunk or stump and stitching that to the next image.
I am very aware that there are two different types of editing, destructive and non-destructive. It is very easy to edit destructively, however restoring the image back to its original state is almost impossible. When you edit destructively you are changing the image so the data is changed or lost. This is fine as long as you know you will never want the image back to its original state, but even so I feel it is best to make sure you have an original copy of the photo, or at least duplicate the original layer so that you can reference back to it when needed.
An alternative to this is working non-destructively, to do this you can use things such as layer masks which change the appearance of the image without taking away or changing its core data. This is a very good way to work as you can edit as much as you like and then simply hide the layer mask to go back to the original image. This is a way of working that I am going to try and use more often as in the past I have had issues where I have edited too much and can no longer get the image back to its original state.
The first thing I did when I opened photoshop was to create a very long document to fit all of my images in. To do this I opened my first picture and using the crop tool I dragged out a long area to the right of the photo, by double clicking in that space Photoshop stretched my canvas so I was left with something like this

This creates space to add the other images.I have already added all of my images so they are in the right order and roughly where I think they need to be but as you can see I have a lot of work to do with the differences in lighting and colour.

I am very aware that there are two different types of editing, destructive and non-destructive. It is very easy to edit destructively, however restoring the image back to its original state is almost impossible. When you edit destructively you are changing the image so the data is changed or lost. This is fine as long as you know you will never want the image back to its original state, but even so I feel it is best to make sure you have an original copy of the photo, or at least duplicate the original layer so that you can reference back to it when needed.
An alternative to this is working non-destructively, to do this you can use things such as layer masks which change the appearance of the image without taking away or changing its core data. This is a very good way to work as you can edit as much as you like and then simply hide the layer mask to go back to the original image. This is a way of working that I am going to try and use more often as in the past I have had issues where I have edited too much and can no longer get the image back to its original state.
The first thing I did when I opened photoshop was to create a very long document to fit all of my images in. To do this I opened my first picture and using the crop tool I dragged out a long area to the right of the photo, by double clicking in that space Photoshop stretched my canvas so I was left with something like this
This creates space to add the other images.
I have started trying to blend the lines so that the proportions and angles look right, once I have done this I will then start to look at blending the colours and lighting together to make it flow round nicely. I still believe that even with all of the blending that I need to do, I can finish this panorama by tonight.
Second Panorama
After having completed my first panorama successfully, I decided to move onto my second. My second idea, which I have mentioned before, is the same scene as my first panorama but this time I have shot it in the day time to show contrast and how easily light changes the mood and feel of a photo. I actually took my photo's on the same day as my first lot of images as I wanted exactly the same area and location to really prove my point.
I took the images at sun set to get a great range of colours, although I knew it would be hard to edit them in together, I didn't want my panorama to look bland, and sun set is something that is so beautiful but only stays for a very short period of time, which gave me the feeling of capturing it and giving this look of stopping time.
So after I had set up my tripod where I thought would look good, I started taking photographs in a circle. When doing this I was very careful to make sure that I picked a point of interest and carried it on to the next photo as you can see below. In these images I have used the stump on the ground to carry on to the next image. This creates the point to stitch around.


After doing this all the way around and back to the same point (in this case the starting tree trunk) I then took my images back and saved them into a folder so that they were all in the same place.
I then opened the images into Photoshop and I am currently stitching them together. I am planning on having this panorama completely stitched together by the end of today, as after this I will need to continue my research to get inspiration for my next location.
Friday, 7 October 2011
First Panorama
Over the last few days I have been working on my first idea, which was to have a day and a night scene in a wooded area. I successfully took my photographs using my camera and a tripod. I have also fully stitched the night scene panorama which I think looks very atmospheric and spooky. It was reasonably simple to stitch together as a lot of the background area was just block black however, there were some branches at the top of the image that were harder as the light was coming from behind them making their shape and direction very defined, although with a few layer masks and careful positioning they now all look as if they are in the right place.
Here you can see how my initial sketch and my actual panorama have kept quite a strong likeness.


I am currently stitching my day time shots together, just by looking at the photos I can see that it is going to be a lot more work than my night scene as there are so many textures, directions and levels to think about. I also think that there may be a slight issue with how the lighting changes around the panorama but this can be sorted in a short amount of time with the levels pallet.
Once I have stitched these images together to create my second panorama I will then decide whether the night panorama is more powerful and interesting, as I would like my panoramas to all be as effective and eye-catching as each other and if I feel that the day time scene is not as good, I will look at the idea of just having night scenes and playing with different lighting and locations to keep them from looking to similar.
Sunday, 2 October 2011
Inspired by Templeton
After looking through Brad Templeton’s work I realised that the most striking images were the ones taken at night with either colourful or angled lighting to emphasise certain parts of the photos and leaving other parts just dark and distant. Because this worked so well I have decided to go for a similar look with my own photographs, however I am also going to shoot the same scenes in daylight as well to give a comparison between full day time light and moody lighting so that people can see how much the mood and feel of the photograph changes when your eyes are drawn to only certain part of the photo when you may otherwise have been drawn to something else.
My first image idea is to shoot a scene in a wood. The daytime scene will show the woods beauty and make it look inviting, while the night scene will have lights eliminating a few of the tree trunks to make the scene look scary and twisted like in a thriller.
I am currently drawing up sketches for this first idea and plan on shooting the photographs tonight.
Brad Templeton
After having read over the brief I decided to look at photographers that use the same technique of stitching images together to create a panorama.
One of the photographers I found who’s work stood out to me was Brad Templeton, every year he goes to a festival in Arizona called “The burning man”. That is where he shoots his amazing 360 degree panoramas.
He has many different panoramas that he has created from 1998 to the present year. These images range from panoramas of the camp site where there are hundreds of tents and caravans scattered around a desert to night time panoramas showing fire displays and neon lighting. It was these night panoramas that really caught my eye.
There was a particular panorama he has created which has a large fire and light show surrounded by a huge crowd of people that have UV paint and glow stick necklaces making every inch of the photo colourful and interesting. I love how Brad Templeton has captured the movement of the fire using a slow shutter speed which has made movement lines against the dark sky, this has given the image a really trippy, unreal feel which works very well.
Templeton has done an amazing job of stitching these photographs together as when you look at the image as one long panorama it has barely any faults, there are only a few traces of blurred, ghost like heads which could have easily have been due to the slow shutter speed rather than the stitching process. The only time this image has a distinct stitching problem is when you view it as a cylindrical panorama, when you do this you can see a line between the star and end of the photograph, although it is hard to complain as Templeton has explained on his main page that his photos are created for printing as a flat image and not for viewing in cylindrical form.
I am going to continue to look through his selection of festival panoramas and possibly use his idea of a night scene in my own work.
I am planning on drawing up some sketches and coming up with some solid ideas in time to start shooting my photographs on Monday.
Brad Templeton’s website: http://pic.templetons.com/brad/pano/
Brad Templeton’s website: http://pic.templetons.com/brad/pano/
Panorama being analysed: http://pic.templetons.com/cgi-bin/imget?f=brad/pano/burning/constitch.jpg&fw=50530
Subscribe to:
Comments (Atom)